Pages

Tuesday 31 December 2013

Happy New Years...some CND shellac, acrylic & nail art

It's been too long since I posted, I've given up apologising as I guess I'll just post as and when I have the time, hope no one minds :-)

This post will mainly be pictures to be honest, I'll write details if I can remember them.

The nails below were for my birthday/holiday. I attempted a 3d flower which worked out...okay. I used Frosted Glen CND shellac, which is one of my all time favourite colours. I went for simple black and white on my toes, I think the design is meant to be like the inside of a shell, I had these on forever, haha.


 I kept my nails this shape and length for a while and just changed the design, below are my attempt at a "glam turtle"


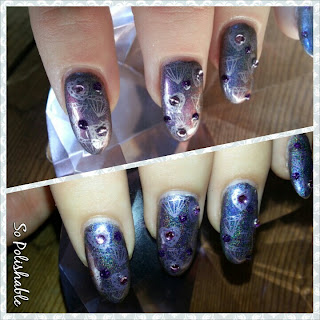
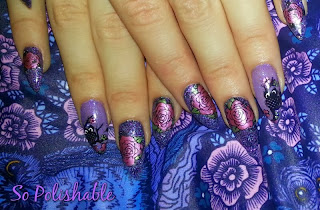
And these purple ones I did to match a dress for a Christening, they took about 5 hours as I didn't have a clue what I was doing. The owls were stamped on and dotted with colour, the roses were hand made decals. These were one of my favourites from the year.


I also learnt some fiddly stuff in college, 3D roses, gems and twirls made using acrylic (liquid & powder)


I did quite a lot of different nails over Halloween but the orange and black were the ones I liked the most, done with polish for a change. I also customised a skeleton hand bracelet for my Halloween costume, I used acrylic, various glitter and rhinestones.


I also won a competition and got some Irresistible glitters which are amazing, I did a super glitter pink leopard print design (using CND shellac)


I played some more with foils, I did my mums nails (using CND shellac) and then loved them so much I copied them using Vinylux and foil adhesive.


I learnt to make jewellery with polish and CND shellac from a fellow nail technician


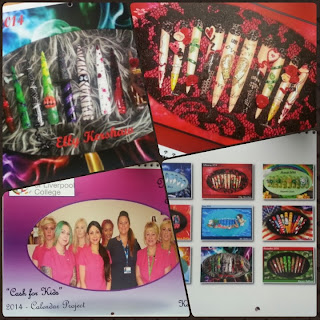
And some of my college work was put into a Calender to help make money for a local charity


These were my Christmas nails, I went for classic red and gold, using CND shellac, glitter and some stamping to finish off.


And last but not least my New Years nails, I will end the year with my favourite shape and colours. Hope everyone has had a good year x




Saturday 21 September 2013

Short Nails for Autumn (CND Vinylux and MoYou London Stamping)


I have trimmed my lovely long nails off for college (sad times) and I'm missing them so much already. I feel like my fingers look all short, lol.
So, I decided to treat myself to a nice shiny mani for the few days I'm allowed to wear it. I went to my trusty Vinylux polish, Gilded Pleasure, as it dries so quickly I don't have enough time to smudge it. I sprinkled on some Irresistible Glitter (Chameleon Iridescent) and topcoated 3 times to get it smooth.
I love this glitter as it changes depending on what colour the base polish is.
I then stamped over it with MoYou's Pro Collection 05 Plate using 17 Silver Holo Polish to give the spider web a shimmery/silvery appearance and topcoated again.


Friday 20 September 2013

Competition!


I've entered my first proper nail art competition on Nail World (Facebook) which runs till the 10th of October, if any of you lovely readers get the chance, could you go and go vote

Nail World

If you click on the link above, my image should pop up and you can just click "like"

Thank you all so much.


Thursday 12 September 2013

Quick Post: More Moyou Mani's and Neon Shellac


This is just a little post, mainly some images, showing what I've been up to since I last blogged. I'm back at college now so hopefully I'll have more advanced nail art coming up over the next year.


I stamped over Enchanted Polish - Time To Pretend with Barry M Lilac Foil using MoYou Londons Princess Collection 02 plate.


The image above I did not long after I got the Suki Collection 01 plate from MoYou London, I used CND Vinylux in Bicycle Yellow, Electric Orange and Decadence to do the gradient and topped with Pure Ice - Heartbreaker to smooth it out. I added a few dots of colour here and there so the stamping wasn't just solid black, this was inspired by Diana from http://dutch-diana.blogspot.co.uk/


This was created with lots of stamping, dotting, freehand and handmade decals. I used MoYou London plates; Rebel Collection 03 and Back to the 90's 01. The red I used was A-England - Perceval, the green was an unnamed one.


The heart tips and cutouts were just a play around for me, practicing gradients and also doing the cutout technique for the first time, I actually found it to be really awkward, my brush didn't want to remove the polish cleanly. I think I need a more sturdy brush for this in future. This was done with the same vinylux colours as the second image.


Last but not least, a lovely nail tech from Belgium sent me some neon pigments to try out. I've got a set of 6 I purchased from ebay which look great in the tub and mix nicely with gel and acrylic but look pastel when burnished into shellac. These stay super bright and glow amazingly under UV lights. This is the green and pink over Cream Puff Shellac.

Thursday 5 September 2013

Enchanted Polish: Time To Pretend

I finally managed to nab myself one of the beautiful polishes by Enchanted Polish I ordered it from LLarowe (who is no longer a stockist for Enchanted Polish, oh well)

I ended up getting Time To Pretend from the collection of the same name, as Kids (the one I originally wanted) sold out before I could even get the page to load, restocks are so much fun :-S

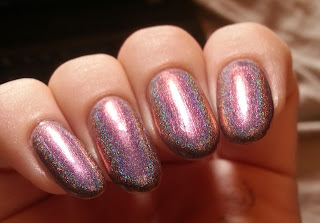
Time To Pretend is a blue-purple (blurple if you will) holographic duochrome which has a gorgeous coppery-maroon-pinkish colour shift. The polish was easy to apply and covered completely in 2 coats, it dried quickly on my nails but they have gel and shellac on underneath which tends to speed up drying time.

The packaging is amazing as well, the box as you can see has holographic lettering on it and the bottle is a good size (16.5ml), so even though it seemed a little pricey, it's more than worth it for the quality of the polish and packaging as well.


The pictures where either taken in the sunshine, with a flash or normal lighting but the polish looks completely different in each light, its definitely a new favourite. I didn't use any topcoat as I was in a hurry, from pictures I've seen it doesn't dull the holographic effect so I will add some when I get the chance. Hopefully I'll be able to buy some more Enchanted Polish soon.

Check out my give-away :-)

Edit: Here's a picture with topcoat added, it did not take away the holo at all, in fact, I think it enhanced it


Thursday 22 August 2013

99 Followers Give-Away :-) UK only

I was going to do a giveaway at 100, but I got there and one person disappeared haha, so I thought why not celebrate 99 followers instead, 99 is just as good :-)I would have loved to have done this for international followers as well but sending polish through the post is a no-no at the moment. I may do a give-away with just nail art/glitters stuff like that in future Thanks everyone for supporting the blog and good luck :-)


a Rafflecopter giveaway
(The prizes: China Glaze Turned Up Turquoise, Illamasqua Muse, Models Own Aqua Violet Beetle Juice, Max Factor Fantasy Fire, Color Club wing fling (that's a guess to be honest, I'm unsure, its pink glass flecked, Pure Ice Oh baby!, OPI Just Spotted the Lizard, Barry M Pink Iridescent, 2 tubs of green glitter, a cuticle pusher and a dotting tool)

Sunday 18 August 2013

CND Vinylux and MoYou London Plates


I took the neon gel off my nails so I needed to do my nails again, luckily my other plates from MoYou London arrived. I got 8 different plates, including one full of moustaches :-)


I chose to do a mani with the 80's and 90's plates, from the Time Traveller set, as there are so many great images on them. Everything I stamped worked really well. I used 2 coats of  CND Vinylux Cream Puff as a base and used A-England Camelot as my stamping polish, with a layer of Vinylux topcoat at the end.


So far I've found the plates/images to be really clear and easy to use, so long as you are light with the scraper (I use a plastic one so as not to damage the metal). No problems with any of my orders either, they were shipped out quickly, once the new plates were in stock.


Sunday 11 August 2013

MoYou London Suki Collection Plate 01

I think I may have forgotten how to blog, forgive me, it's been so long.

I recently joined a group on Facebook specifically for stamping, it's a great place for inspiration but not at all good for my bank account. I came across a company called MoYou London, who are a UK based on-line shop selling accessories for hair, nails and body. The uniqueness of the plates and imagery on the site instantly drew me to them. I initially only ordered one plate as I was cautious about the quality but I needn't have worried. I have ordered 6 more and with more releases coming next week I'm sure there will be plenty more on the way. The plates are not all produced yet so there is up to a 5 week wait on the newer ones but any queries can be directed to their fab customer services.


I had a little play to see if the tiger could be made into a long image and it worked great, I'd already finished my nails so I just did it on paper (excuse the crude nail shape drawings)


The base is CND brisa lite gel mixed with glitter and pigments.

Thursday 9 May 2013

CND Vinylux

CND Vinylux, A quick review and comparison

I'll just say this to start off with I love CND's Shellac so I was expecting a lot from this polish when they released it. It is a long wearing (up to a week), quick drying (8.6 minutes) 2 colour coat + topcoat system.

I was lucky enough to attend an Event where I received a few to try before they went on sale. I've tried 2 colours so far and they are great, they really do dry fast and the topcoat is very shiny. I have not worn a colour for a week though as I can only wear my polish when I'm not in college but my teacher has had it on a full week.

I ordered a few new colours as my set mainly included white, pinks and reds. One of the colours I thought was similar to some other polishes I own, when it turned up, I released it was identical so I'll probably sell the others.


So from left to right we have CND Vinylux Gilded Pleasure, Chanel Peridot and OPI's Just Spotted the Lizard


They are identical in colour and colour shift to my eye. The application for all 3 were a little streaky but vinylux smoothed out with 2 coats. The others took an extra coat for opacity and smoothness but the  brush strokes could still be seen with Peridot although that may have been my application. Peridot had slightly more shimmer than the Vinylux and OPI but with the Vinylux topcoat, Gilded Pleasure came out slightly shinier.


Tuesday 19 March 2013

Illamasqua Pink Raindrops - Limited Edition

Illamasqua Pink Raindrops - Limited Edition


When Illamasqua's Facebook page received 100,000 likes they celebrated by releasing a Pink version of their cult polish "Raindrops". I love the original but don't think it suits my skin tone so It barely gets used, I was hoping the pink version would look better. I bought it here as soon as it was available and it turned up this morning, pretty fast postage. I only got a quick look at it as I was running out the door and thought it didn't look very pink, more along the lines of a pink toned neutral or nude.


I did a quick swatch (over my acrylics) when I got home. It has the same clear shimmery flakes that the grey version has and is less sheer but I think I was hoping for something pinker. It does suit my skin colouring better though so maybe it'll grow on me. I think I'd like it more on my nails if they were shorter.

Here is my blog post about "Raindrops"

Wednesday 16 January 2013

Hotski to tchotchke and Ruby Ritz Shellac


I'm so full of cold, I haven't changed my nails since last week and I don't see me re-doing them in the near future, fortunately I love the colours and design so It's not all bad. I used 2 coats of Hotski to Tchotchke. On 2 of my fingers I mixed up some sparkly green glitter and some green iridescent bar glitter and pressed that in, I then stamped them with a hounds-tooth pattern from a bundle monster plate. On the other fingers I added a thin layer of Ruby Ritz which changed it to a lovely deep purple red glittery shade which looks amazing in person. 


This photo was taken a couple of days after I'd done them. The photos below are from today, a week after they'd been done. So you can see the green glitter better. Not much tip wear or a massive gap by my cuticle so I think I can get another week out of them easily :-)